Form, and Reps. Mastering proper Technique is the foundation of safe and effective training. Without learning how to control the bar path, engage the chest, and stabilize the shoulders, you risk injury and limit your potential. Alongside this, developing raw Strength allows you to handle heavier loads and push past sticking points, but strength alone is not enough. Correct Form ensures that each lift is performed efficiently, protecting the joints while targeting the intended muscles. Many lifters struggle because they either focus too much on weight or ignore the finer details of their positioning, grip, and setup.
Equally important is the management of Reps, as the number of repetitions directly influences results. Lower Reps typically build maximum power, while moderate to higher ranges help with hypertrophy and muscular endurance. A well-structured program blends all four aspects, ensuring steady improvement over time. Whether your goal is to increase your bench numbers or to build a stronger chest, you need to prioritize these fundamentals. Balancing Technique, Strength, Form, and Reps creates a powerful synergy that leads to long-term gains and consistent progress in the gym.
Why the Bench Press Matters
The bench press is more than a chest-builder. It’s a compound movement that recruits multiple muscle groups:
-
Chest (pectoralis major and minor): Primary movers
-
Shoulders (deltoids): Assist with pressing
-
Triceps: Lock out the bar at the top
-
Back and lats: Stabilize and control the bar path
-
Glutes and legs: Provide power through leg drive
Think of it as a full-body push exercise, not just a chest workout. Done right, it boosts upper body strength, helps athletic performance, and, yes, adds size to your pecs so you fill out a T-shirt better.
Step 1: Setting Up for the Bench Press
Before you even unrack the bar, your setup determines 80% of your success. Here’s how to dial it in:
1. Find the Right Bench
-
Pick a sturdy, wide bench. Narrow benches can leave your shoulders unsupported, increasing injury risk.
-
Make sure the rack height is set so you don’t waste energy lifting the bar too high or too low before starting your set.
2. Position Yourself Under the Bar
-
Lie down with your eyes directly under the bar.
-
Plant your upper back firmly on the bench.
-
Pinch your shoulder blades together as if you’re trying to crush a pencil between them. This protects your shoulders and creates stability.
3. Set Your Feet
-
Plant your feet flat on the floor, slightly behind your knees.
-
Drive them into the ground throughout the lift to create leg drive, giving you more power and stability.
-
If flexibility is an issue, some lifters bench on their toes—but flat feet often give a stronger base.
4. Arch Your Back Slightly
-
A natural arch in your lower back is good. It keeps your chest high and reduces shoulder strain.
-
Don’t overdo it unless you’re powerlifting competitively (those huge arches are for maximizing leverage).
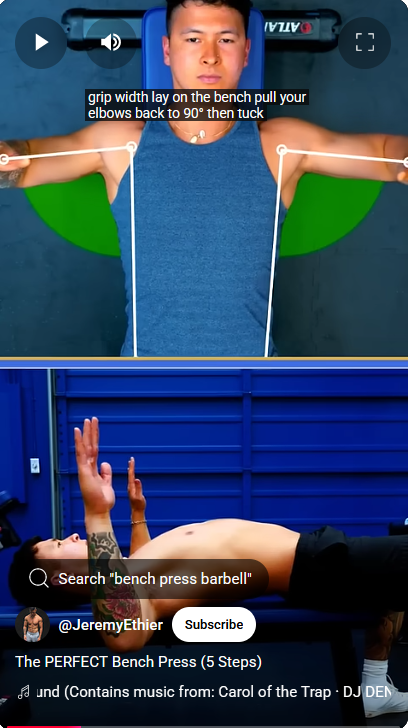
Step 2: Grip and Hand Placement
Your grip can make or break your press.
-
Width: Start with your hands just outside shoulder-width. Wider grips target the chest more, while narrower grips hit the triceps harder.
-
Wrist position: Keep your wrists stacked directly over your forearms. Don’t let them bend backward.
-
Thumb placement: Always wrap your thumbs around the bar. The “suicide grip” (thumbless) is dangerous—if the bar slips, it’s game over.
Pro tip: When grabbing the bar, think about bending it like a U-shape. This activates your lats and keeps your elbows tucked at a safer angle.
Step 3: The Bench Press Execution
Now for the fun part: moving the weight.
-
Unrack the Bar:
-
Take a deep breath, brace your core, and press the bar straight out from the rack until it’s above your chest.
-
-
Lower the Bar:
-
Bring it down slowly and under control.
-
The bar should touch around your mid-chest (between nipples and upper abs), not your neck or stomach.
-
Elbows should be at a 45-degree angle, not flared wide.
-
-
Press the Bar Up:
-
Push explosively while maintaining control.
-
Use your legs to drive into the floor.
-
Exhale forcefully as you pass the hardest part (the sticking point).
-
-
Lock Out:
-
Fully extend your arms at the top without shrugging your shoulders forward.
-
Keep your chest up and lats tight.
-
That’s one rep done with perfect form.
Step 4: Breathing Technique
Breathing is often overlooked, but it’s a game-changer:
-
Before lowering the bar, take a deep diaphragmatic breath (into your belly, not your chest).
-
Hold it as you lower the bar to stay tight.
-
Exhale as you press back up.
Think of your torso like a full soda can. Full and pressurized = strong and stable. Empty = weak and crushable.
Common Bench Press Mistakes to Avoid
Even seasoned lifters fall into these traps:
-
Bouncing the bar off the chest: Dangerous and takes tension off muscles.
-
Elbows flaring out: Puts your shoulders in a compromised position.
-
Feet floating or moving: Weak base = weak press.
-
Not using full range of motion: Touch your chest lightly, don’t stop halfway (unless doing a specific variation).
-
Lifting hips off the bench: That’s cheating and risky for your lower back.
Bench Press Variations
Want to spice things up or target different muscles? Try these:
1. Incline Bench Press
-
Bench set at 30–45 degrees.
-
Emphasizes the upper chest and shoulders.
2. Decline Bench Press
-
Bench tilted downward.
-
Hits the lower chest more.
3. Close-Grip Bench Press
-
Hands closer together.
-
Triceps-focused movement.
4. Dumbbell Bench Press
-
Greater range of motion.
-
Improves stability and balances out strength imbalances.
5. Floor Press
-
Performed lying on the floor.
-
Reduces shoulder strain and focuses on lockout strength.
Bench Press Progressions for Beginners
If the barbell feels intimidating, don’t worry. Here’s a path you can follow:
-
Start with push-ups: Build basic pressing strength and stability.
-
Use dumbbells or a Smith machine: Easier to control than a free barbell.
-
Work with just the bar: Standard Olympic bar weighs 20kg (45 lbs).
-
Gradually add plates: Increase weight slowly and consistently.
Should You Arch Your Back When Bench Pressing?
If you’ve spent any time around lifters, you’ve probably seen someone with a huge arch in their back during the bench press. At first glance, it can look strange—even unsafe. You might wonder, “Aren’t they just cheating?”
The truth is, arching your back during the bench press isn’t inherently wrong—it just depends on how much you arch, why you’re doing it, and what your training goals are.
Benefits of a Back Arch
-
Protects your shoulders: A slight arch keeps your chest high, reducing stress on the shoulder joint and lowering injury risk.
-
Shortens the bar path: A bigger arch reduces the distance the bar travels, making it easier to press more weight (which is why powerlifters use it).
-
Engages the chest more effectively: By lifting the ribcage, the pecs are placed in a stronger pressing position.
-
Improves tightness: Arching your back helps you lock in your upper back and lats, giving you a more stable pressing platform.
Risks or Downsides of Over-Arching
-
Not ideal for general lifters: Extreme powerlifting-style arches can be uncomfortable and unnecessary if your goal is just muscle growth or fitness.
-
Lower back strain: If your core and hip mobility aren’t great, forcing a huge arch can put stress on your lumbar spine.
-
Reduced range of motion: While this is a benefit for powerlifters chasing max weight, it may limit muscle activation for hypertrophy.
Flat Back vs. Arched Back
-
Flat Back (or very minimal arch):
-
Best for beginners.
-
Keeps technique simple.
-
Encourages a longer range of motion, good for muscle growth.
-
-
Moderate Arch (slight curve in lower back):
-
Ideal for most gym-goers.
-
Protects shoulders while keeping tension on chest muscles.
-
Balance between safety and performance.
-
-
Extreme Arch (seen in powerlifting):
-
Purpose: lift the heaviest weight possible.
-
Great for competitions but not necessary for everyday training.
-
Practical Advice
-
Always keep your glutes and upper back on the bench—only your lower back should arch.
-
Don’t force flexibility you don’t have; work with what feels natural.
-
If your goal is strength (powerlifting), learn to safely create a bigger arch.
-
If your goal is muscle growth (bodybuilding), stick to a moderate arch and focus on controlled reps.
Final Takeway
The bench press isn’t just about stacking plates and showing off—it’s a skill. Done correctly, it will help you build a stronger chest, healthier shoulders, and serious pushing power. Done wrong, it can lead to pain and injury.
So next time you lie down on that bench, slow down and go through the checklist: feet planted, back tight, chest up, grip locked, breathe deep, and press with control. Whether you’re chasing a new personal record or just want to feel stronger and more confident, the bench press can be your best friend—if you treat it with respect.
Go forth, press safely, and maybe next time someone asks, “How much do you bench?”, you’ll answer with a number that makes you proud.